Ultimate Guide to Injection Molding (1-2)
Upload Time:
Feb 25, 2024
When it comes to plastic part production, there is no manufacturing method that comes close to the popularity of injection molding. It’s an ideal choice for high-volume production because of its qualities. Furthermore, only a few manufacturing processes can claim to be as well-known and versatile as injection molding. The process can create thousands or even millions of plastic parts with the utmost consistency and at the lowest cost.
Injection molding has been around for a while, but still continues to facilitate the manufacturing industry and plays an integral role in making plastic part production more efficient, cost-effective, and durable for multiple industries.
That’s not all, the costs associated with production go down as you increase the volume because of economies of scale. That’s why the manufacturing method continues to grow rapidly across the industry. In 2022 alone, the estimated market capitalization of plastic injection molding is about $43 Million, and the number continues to grow with time.
While the process is simple, consistent, and cost-effective, there are a few limitations as well. The quality requirements of the process are significant, which means that there is little to no room for mistakes.
That’s why manufacturers have to implement stringent quality standards in the injection molding process to guarantee excellent results. Process-related issues, that can potentially impact the overall quality and consistency need to be avoided as much as possible. Here are a few of the common ones:
- Low-Quality Molds – what causes quality issues in injection molds? What are the best practices to ensure consistent and reliable results irrespective of the industry? This guide answers all these questions.
- Inspection of Tooling – How to ensure quality in the molding process and its components? This guide has an overview of checking the tooling, the prevalent standards, and other common tests.
- Common Causes of Issues – It’s always better to learn from the experience of others. So, what are the common causes of issues in any injection molding setup, and how to overcome them? This guide will answer it all.
- Low Productivity – Productivity and efficiency are among the most important factors for any production setup after quality. This guide will go over some proven techniques to improve that.
- Troubleshooting Mold Defects – Despite the best efforts, some defects can make their way to the final product because of time and other factors. What are the ways to troubleshoot those defects and ensure a perfect piece for the final application? This guide answers it all.
This text covers some integral elements of the injection molding process and sheds some light on the process, best practices, and material choices for you. By the end, you’d know enough to get started with an injection molding project and will be aware of the common choices you are expected to make during the process.
The Basics of Injection Molding
What is injection molding and how it works? When did it start and how it became so popular in the industry? Are there any special requirements for the process and what are the main factors that affect the overall quality of the results?
The following section will take a brief look at the basics of injection molding and shed some light on how the process works.
What Is Injection Molding?
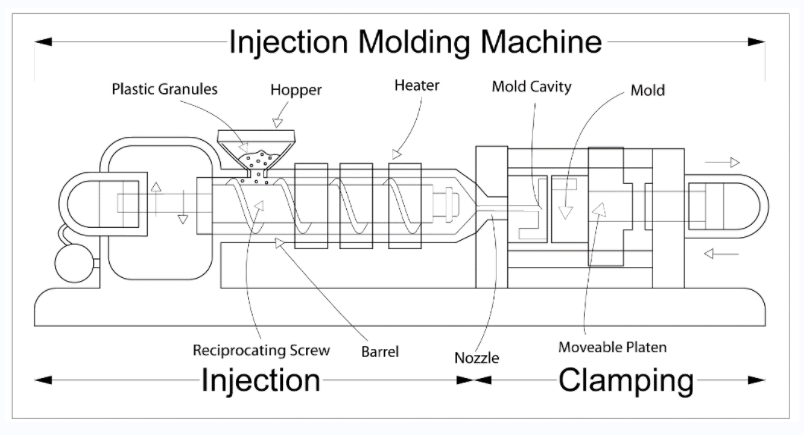
In the simplest terms, injection molding is a plastic production technique that uses granular polymers and melts them to create identical plastic parts in the shortest time. The process utilizes molds to give shape to the melted plastic which solidifies under pressure to give a durable and reliable plastic product.
Injection molding can create hundreds to thousands of parts and is among the most cost-effective methods to produce plastic parts. In fact, the higher the volume, the more economical production would be. Resulting in significant savings without any compromise on the quality and other technical parameters.
Brief History of Plastic Injection Molding
The theoretical foundation of plastic injection molding started in the 19th century when the first molding machine was patented. The machine was simplistic relative to modern standards and could only process certain materials and had safety issues due to flammability and other factors. That’s why the production of plastic parts was limited to simplistic items like combs, and buttons at a very low scale.
The situation remained the same until 1930 when most of the popular thermoplastics integral to modern industry were developed. They included polyolefins, polystyrene, and polyvinyl chloride (PVC), which continue to deliver excellence and have cemented their position in various industrial applications.
This development, combined with the additional demand for a cheaper and viable alternative to metals led to modern injection molding setups. The American inventor, James Hendry played an integral part by building the first extrusion screw injection machines. With time, those machines slowly transformed the plastic molding industry into what it is today.
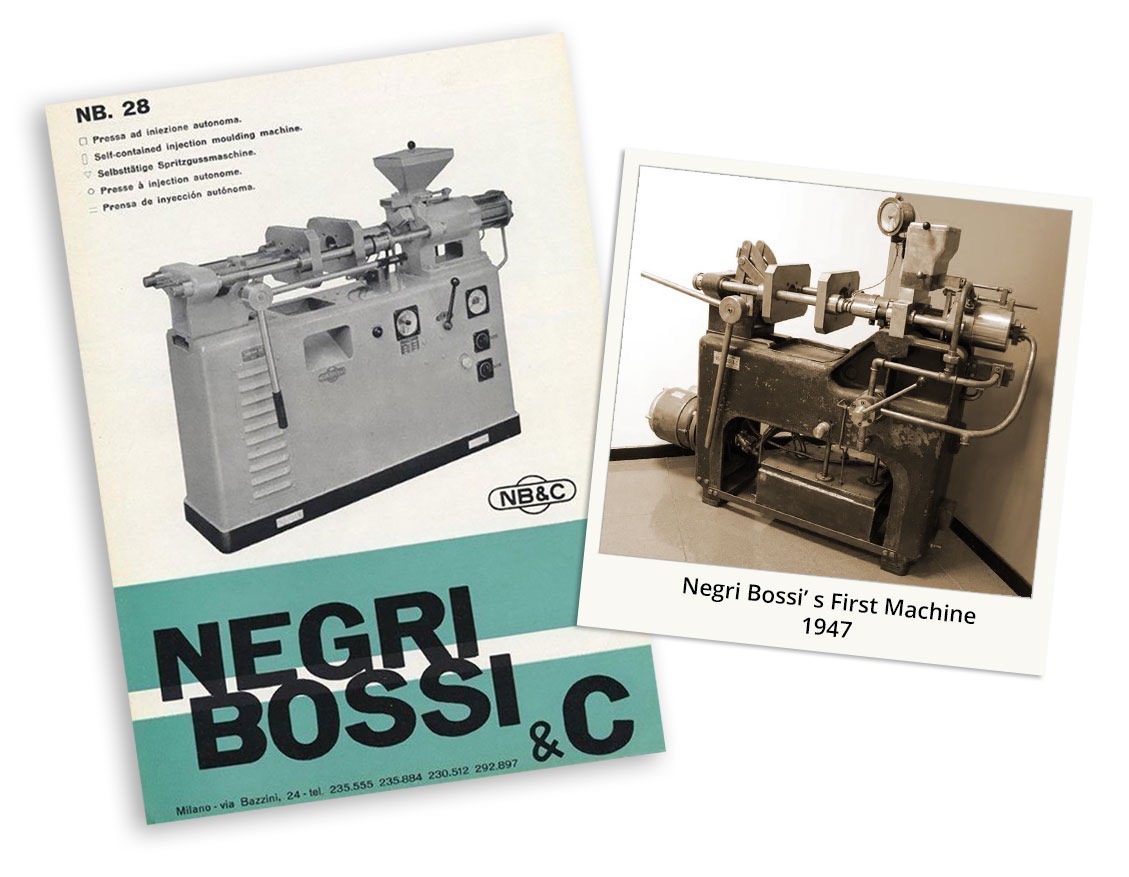
The picture shows how the machines themselves evolved over time. This comparison depicts the injection molding machines by Negri Bossi, one of the most famous manufacturers in the market. As the fundamental principles of the process evolved, all the manufacturers updated their machines to ensure that they are in line with the recent technological advancements.
Today, plastic products perform exceptionally well in a variety of high-performance industries and have a long service life. Additionally, modern processes continue to make plastics easier and more economical to recycle, making plastics safer for the environment as well.
Injection Molding Process
In the simplest terms, the injection molding process starts by heating any thermoplastic to the point of liquidation and then using existing molds to achieve the required shapes. The industry also considers the preparation of the mold as part of the process. It all starts from that stage and the process then shifts toward the creation of the plastic part. Let’s look at three types of injection molding processes.
Plastic Injection Molding Process
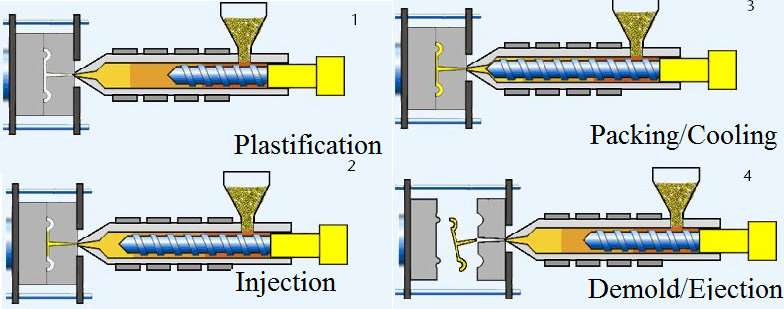
The plastic injection molding process has two basic stages: Stage 1 involves designing and creating the mold, and Stage 2 involves six repetitive steps.
Stage 1: Manufacturing the Mold
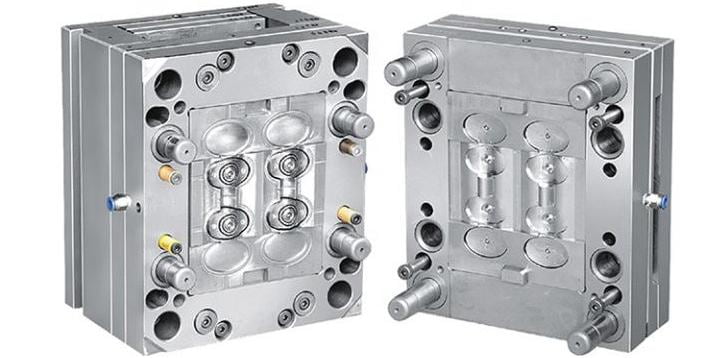
Mold creation is the most fundamental part of the process. Engineers use CAD and CNC machining to determine the mold’s specifications and design. These specifications include its geometry, dimensions, and even the texture of the component.
When it comes to the injection molding process, the cost of making the mold itself is the most significant expenditure you’ll undertake. Even the price of a typical mold that can bear production runs of 1,000 to 10,000 units would fall between $2000 to $5000. The cost of molds for complex parts is even higher.
Manufacturing the right mold requires a high level of expertise and skills. Engineers must also run several simulations and tests to verify whether the design meets their requirements. High-quality aluminum or steel materials are also required to ensure that the molds are durable enough to survive several production cycles. Fortunately, 3D printing has allowed the cost of manufacturing molds to drop, especially for low-run injection molding.
Stage 2: Make Plastic Part with Injection Mold
Stage 1 is all about finalizing the mold’s design and manufacturing it. After that, the rest of the steps involved in the injection molding process are easy. The following are the six repetitive steps to produce injection molded parts:
Step 1: Clamping
The clamping phase is a simple step that initiates the injection molding process. A typical injection mold has two clamshell-style pieces. Here, manufacturers use a machine to press the two metal plates of a mold together.
Step 2: Injection
The injection phase starts once the clamping process is over. But, before the injection begins, the plastic should be melted by heat until it is completely liquid. Then, inject the liquid into the mold. While the process might seem simple on paper, it’s not exactly a walk in the park. It’s necessary to ensure that the temperature stays constant without any variation throughout the process. Otherwise, the mold will not set properly.
Step 3: Dwelling
Dwelling erases any air pockets that may have formed within the mold during the injection. The phase uses pressure to ensure that the meted liquid fills every cavity in the mold.
Step 4: Cooling
This step is straightforward. Manufacturers leave the mold alone and allow the liquid to cool down. After the solidified plastic liquid takes the shape of a specific part, it’s time to safely take out the product from the mold.
Step 5: Mold Opening
The next step involves removing the part from the mold. For this, manufacturers use a clamping motor to safely remove the product without damaging it.
Step 6: Ejection
Here, engineers use an ejection bar to push the product out of the cavity. Excess material is cut down through cutters, and the final product is delivered to the customers for use after final inspection.
Overmolding
Overmolding is a popular and unique process where two different materials combine to create a single new product. A rigid and durable plastic typically acts as the substrate or base material. Afterward, another softer material either completely or partially covers the parts to create a protective layer. The process may sound straightforward and uncomplicated, but it’s important to do it right by carefully selecting the right combination of materials and maintaining control over the injection molding process. .
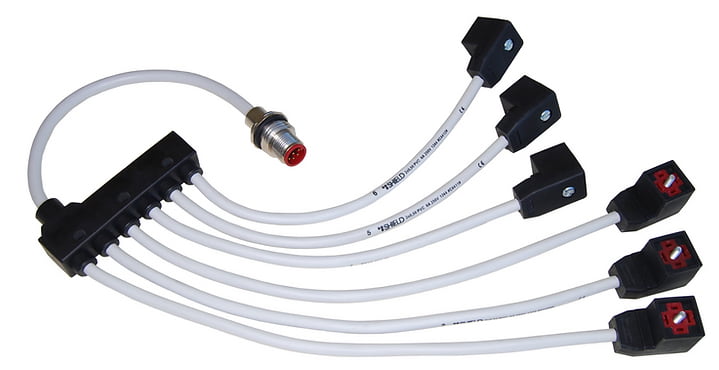
Overmolding has a lot of industrial applications and potential and the following 4 types of overmolding parts are common in the industry.
- Plastic over plastic
- Rubber over plastic
- Plastic over metal
- Rubber over metal
Insert Molding
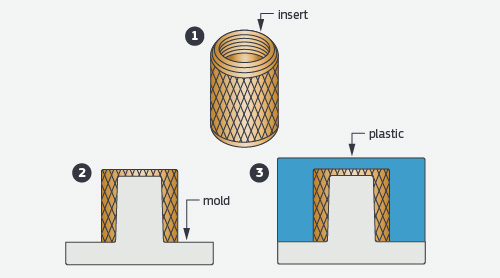
The fundamental principle of insert molding and overmolding is the same. The only difference is that the base material in this case is a metal insert while a plastic layer encases it. In this process, the metal part is added to the mold before the infection stage. The thermoplastic flows to the metal base and takes the shape of the mold to cover the metal component.
The Advantages and Disadvantages of the Injection Molding Process
While injection molding is an excellent choice for many plastic applications, it has pros and cons that limit its application in some aspects. The following table gives a detailed comparison between the advantages and disadvantages of injection molding.
| Advantages | Disadvantages |
|
– High Efficiency: Plastic injection molding is known for its efficiency and fast production. Its high production output makes the process cost-efficient and ideal for mass-production.Low Waste: The process focuses on repeatability. Even the leftover plastic pieces can easily be recycled, and reused. These facts make injection molding a green manufacturing process compared to its other alternatives.
– Lower Labor Costs: Naturally, labor costs are a significant factor for any manufacturing process like machining, casting, etc. Injection molding, however, works automatically and needs minimal input. Thereby reducing the overall costs
– Complex Part: The injection molding process allows manufacturers to create a uniform and complex parts. Through the process, highly precise and high-quality parts can be created.
– Flexibility: Not only does plastic injection molding offer the ability to create complex parts, but the process is applicable to different materials and colors.
|
– High Set-up Costs: While the injection molding process is known for being economical, the initial costs of setting up the process are quite expensive. Injection molding requires designing and molding before production can take place. Some of these costs include manpower, supervision costs, and material acquisition.
– Lead Time: Introducing a new product requires a significant investment as well as time. It can take months of planning, designing, and testing to have the finished molds at hand. Of course, once you have the mold at hand, the process can be finished quickly. However, the time spent on creating the final part can’t be ignored.
– Suitable for Small Parts: Injection molding is ideal for manufacturing small and precise parts. However, creating large parts using the process is excessive. Even making the mold for a large piece is an enormous bill that you’ll have to pay. Moreover, other processes, such as Plastic Fabrication, are far more suitable for manufacturing large parts and components.
|
Injection Tooling and Molding
There are several options when it comes to selecting the right tooling for any injection molding project. Based on the aforementioned parameters, any selected option needs to have the right cost, preparation time, and other technical factors.
Below are the common injection molding tooling methods to ensure quality and consistency in the design and products.
By Materials
1 – Steel Molds
Durable, consistent, and perfect for high-volume production. Steel tooling is the ideal choice for industrial applications where durability and consistency are the primary concern. Another important thing to add is that steel molds are a perfect choice for applications with very high tolerance requirements.
Generally, the typical tolerance that steel molds offer hovers around +/-0.002”, which is quite impressive. However, using techniques like making the mold steel safe and allowing adjustments to the mold to creep up on the tolerance can improve that number even more.
There are some drawbacks of steel molds as well. The most important of them is the fact that steel molds have extremely high lead times and initial costs. This may be a dealbreaker for a lot of projects as higher lead times mean lost opportunity costs and less time to get ahead of the competition.
- Steel Alloys used to make injection molds: 420, NAK80, S136, 316L, 316, 301, 303, 304
- Stainless steel variants used to make injection molds: 420, NAK80, S136, 316L, 316, 301, 303, 304
2 – Aluminum Molds
Another common choice in the industry is aluminum which presents the best of both worlds relative to 3D printed and steel molds. Aluminum molds can either be for prototypes or for high-volume production depending on the application. For prototyping, aluminum molds offer faster lead times, which means that a part can be ready in almost a week. However, prototyping molds are not too durable and can only handle about 2000 pieces before needing a replacement.
On the other hand, production aluminum molds combine the best characteristics of aluminum with Masted Unit Die (MUD) inserts to address the durability problem as well and can last for 10,000 or even 20,000 in some cases. If all the parameters are consistent, the shorter lead time and the overall economics remain the same for Aluminum. Thereby making Aluminum the perfect material choice for meeting the dynamic requirements of the current industry.
- Aluminum Alloys used to make injection molds: 6061, 5052, 7075
3 – 3D Printed Tooling Molds
This is the ideal choice for situations where speed is of the essence. Businesses rely on 3D-printed molds to test out new design iterations and field-test their concepts. 3D printing is relatively easier as the computer does the majority of the work and caters to even the most complex designs as well.
However, these molds have several limitations as well because of their material properties and are only good enough for smaller, low-volume batches. For higher production numbers, other options like steel and aluminum molds are a better choice.
Here are a few common materials that are used to make 3D printed tooling molds:
- PETG (polyethylene terephthalate)
- ABS (acrylonitrile butadiene styrene)
- Nylon (a.k.a. polyamide)
- PP (polypropylene)
- TPE (thermoplastic elastomers)
By the Number of Cavities
Another common way of distinguishing between the type of molds is through the cavities they have. Generally, the choice is between either a single-cavity or multiple-cavity mold depending on the application. Depending on the application, family mold also becomes a viable choice but its use is fairly limited when compared with the other types. Here’s what they are exactly:
Single Cavity Mold
A single cavity mold is the most basic design where only one part is created per injection cycle. It is often used in applications where costs are the primary concern or if the machines with higher tonnage are unavailable. Single cavity molds are a viable choice for smaller to medium production volumes, generally up to a few thousand parts.
Multi-Cavity Mold
Multi-cavity molds have the capability of creating several parts of the same design in one cycle. It’s ideal for projects where economies of scale are important and the production volumes range from a few thousand to even hundreds of thousands.
Multi-cavity molds, however, are more complex to make and require machines with higher tonnage. Thereby increasing the initial costs of the mold.
Family Mold
Family molds are special kinds of molds that allow the creation of different kinds of parts in a single cycle and single type of mold. Technically, family molds are technically the same as multi-cavity molds. However, the difference is in the type of products.
Injection Mold Surface Finishes
The finish needs to be perfect to give a complete look to any product. Furthermore, aesthetics are not the only thing that’s important. An excellent product finish not only affects the product’s outlook but also affects the product’s quality and longevity.
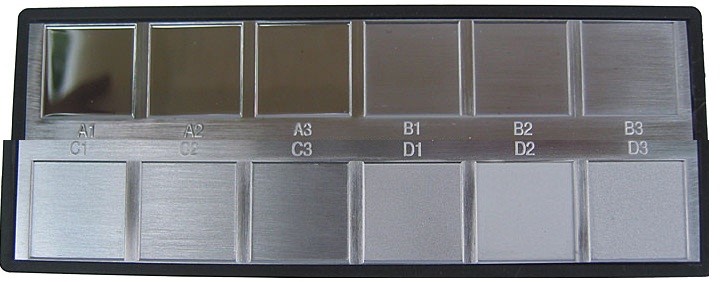
Regarding industry standards regarding surface finishes, the two most prominent names that pop up are SPI and VDI finish. Here’s what you need to know:
SPI Surface Finish
SPI, also known as Plastics Industry Association (PIA) , has four categories of surface finishing, ranging from a glossy to a textured finish for your parts. SPI understands the importance of a surface finish for a product’s aesthetics. Even a minimal difference in the finish from the design concept can drastically influence the look and feel of a product. Each category comes with three subcategories to accommodate manufacturers and further allowable deviations.
– Glossy Finish
A glossy finish – or a grade-A finish – gives a smooth and shiny look to your product. It’s also the most expensive finish you can get. Grade A finishing requires hardened tool steel molds. By using various grades of diamond buffs, these molds are further polished. For a glossy finish that shines, the product undergoes a finishing process that gives it an unclear texture and allows it to scatter light. To achieve this, a fine-grain buffing paste with a rotary buffing machine is the most common and quickest choice.
Grade A has three subcategories that are different in the extent of their glossy look and cost. This subcategory includes:
- Super High Glossy Finish (Grade A-1)
- High Glossy Finish (Grade A-2)
- Normal Glossy Finish (Grade A-2)
– Semi-Glossy Finish
Grade B is also known as a semi-gloss finish. This finish is excellent for removing marks and scratches from machining and tooling. Best of all, it has a reasonable cost. Usually, grade B finishing is produced by utilizing different sandpapers and a linear motion application method.
Similar to grade A, a semi-glossy finish also has three different subcategories. The difference exists in their cost and finishing method. It includes
- Fine Semi-glossy Finish (Grade B-1)
- Medium Semi-glossy Finish (Grade B-2)
- Normal Semi-glossy Finish (Grade B-3)
– Matte Finish
Both grade A and grade B finishing are usually expensive options that eventually increase the product’s production costs. If you’re looking for more affordable options, grade C – or Matte Finishing – is a recommended choice.
Matte finish is a popular and economical surface finish you can get for your product. It is a stone finish that can easily hide marks and scratches from machining and tools. The process involves polishing the product with a fine stone powder. This step is also the first step for glossy and semi-glossy finishing.
Matte finish includes the following three categories
- Fine Matte Finish (Grade C-1)
- Medium Matte Finish (Grade C-2)
- Normal Matte Finish (Grade C-3)
– Textured Finish
The final SPI category you need to know about is textured surface finishing. Textured finishing is used for both industrial and consumer products simply because of its wide aesthetic appeal. Incorporating a textured finish on your product involves similarly smoothing the product as a matte finish. After that, the product is dry blasted using materials such as glass beads. The randomness of a dry blast creates a textured surface finish.
Textured finishing is a reasonably cost surface finish that hides machining marks and even gives a good holding grip for the product.
VDI Mold Texture Finish
VDI is the most popular injecting molding surface finish. Developed by the Society of German Engineers, the surface finishing standard is mostly followed in Europe and Asia. Texturing finish is one way of applying patterns to the mold surface successfully. This procedure gives you flexibility in the design phase, and the freedom to create a unique final look for your parts.
To ensure the desired results, You need to consider the mold texturing finish during the design phase. Mold texture is sometimes used in designs for practical purposes. The right texture finish can also help conceal some obvious surface flaws on molding material as well.
In some applications where you expect to handle a particular part frequently, this surface finish can help. You can add features that can conceal fingerprint marks. Similarly, there are other options like knurling using VDI texture to enhance the user’s grip or to lessen friction-related part wear.
VDI differs from SPI because it uses Electrical Discharge Machining and is incorporated within the molding machine. It is also flexible enough to be used with classical tools utilized in SPI, such as grit and sandpaper, which is one of the major advantages of this surface finish.
How to Choose Injection Molding & Tooling
Tooling is an integral part of the injection molding process as the final product and shape depend on it. The right tooling can ensure both the durability of the product and keep the process efficient. However, choosing the right kind of tooling for any injection molding project is easier said than done. It all starts with considering the right parameters and then finding the right balance between cost, performance, and speed.
Here are the 8 most important parameters for choosing the best kind of tooling for the job.
Project Scope
This is perhaps the most important parameter that determines the right kind of tooling for a project. For example, consider a prototyping lab working on trying out new designs. For such cases, the best choice would be rapid 3D printed tooling because of the speed requirements or prototyping aluminum tooling for more demanding applications.
Prototyping doesn’t focus too much on durability and other factors as the most important requirements are better speed and lower costs. For such cases, another choice like steel would not make sense.
Part Size
The next parameter that plays an integral role during the tooling selection process is the part size. Obviously, larger parts would need separate specialty tooling. However, smaller part sizes can give manufacturers more freedom to opt for a much cheaper, yet equally effective alternative; insert molds.
Insert molds are quite popular in the industry because of their lower costs and higher productivity. Rather than paying the full price of standalone tooling, businesses can select insert-tools that fit under pre-existing bases. Thereby reducing waste and plummeting the high costs associated with this stage of the process.
Expected Volume
For industrial applications, economies of scale play an integral role in making processes affordable. The expected volume can sometimes determine the course of action. Whether it’s worth investing in durable tooling or opting for something that can simply get the job done for the time being.
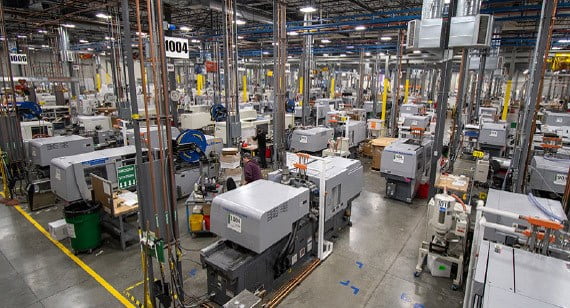
Generally, single-cavity tooling is commonly used for low-volume part manufacturing because it’s more economical than multi-cavity tooling. However, multi-cavity tooling can significantly lower part price at the expense of a higher upfront cost.
Material
The material plays an important part in determining the tool’s life because of wear and tear. Lighter material choices like polypropylene don’t have a lot of effects on the mold. However, other materials like nylon or anything else that contains abrasive particles like glass have shorter lifespans.
The prevalent industrial standard is aluminum or steel tooling for 8000 to 12,000 pieces while anything lower than that would be suitable for other types of molds.
The Complexity of the Part
The geometry has a significant impact on the tooling parameters. Naturally, features like cavities, undercut, and cores are harder to develop and translate to a significant increase in cost. Moreover, complex shapes also need expertise and experienced talent is not easy to find. For prototyping, 3D printing would work but replicating the same with higher materials like steel can pose a problem.
Another important factor related to the complexity and geometry of the part is the surface finish. Polish, texture, or any other feature require great control over the tooling and not all options can deliver them. For applications where aesthetics and functionality have an equally important role, the options for the type of tooling can become even more limited.
In the simplest terms, the more complex a design is, the more resources and expertise it will need. Naturally, this would also drive up the overall costs as well and might even make the specific project unviable.
Applications
Depending on the application of the product, both the durability of the tooling and the product become important. Aluminum, for instance, can process a maximum of 20,000 parts while steel can take it up to 100,000.
One more important factor to mention is tooling maintenance. Constant maintenance ensures that the tooling won’t fail and allows for a larger number of alternatives.
Available Time
Metal tooling can take anywhere between 6 to 12 weeks. Sometimes, that is too long and forces you to opt for an alternative that is either readily available or requires less time. Sometimes even at the expense of other parameters like quality and durability.
Project Budget
Another integral parameter is the overall budget of the project. Tooling for injection molds is responsible for a significant portion of the overall expenses of the project. While choosing the tooling, you always consider the overall budget and decide on the material according to the initial capital requirements, the production costs, and the overall budget of the project.
Plastic Injection Molding Materials
It’s difficult to say what the best material for plastic injection molding resin is. It entirely depends on what the project requirements are. It’s essential to find the optimal material with both the physical and technical characteristics suitable for a specific application. Some of the most important factors include load, strain, stresses, and the characteristics you need for your part. These factors include loads, strains, tensile strength, and much more.
Finding the right material involves trial and error. It’s important to have a thorough understanding of the internal structure of the material and conduct several field tests to gauge the actual performance during application. The following section discusses some of the most recommended material choices for injection molding.
Nylon (PA)
Nylon is a synthetic material and is popular in the automotive industry. The material is tough but not heavy. It’s also far cheaper compared to producing metal analogs.
Best of all, nylon comes equipped with high heat and abrasion resistance. The material boasts impressive noise-dampening properties. Its abrasion-resistant characteristics make it an ideal choice for high-wear applications.
However, you should look at alternative materials if your application involves exposure to water. Nylon Pa tends to absorb water. Similarly, sunlight and strong acids can seriously damage the material as well.
As mentioned, nylon is usually used in the automotive industry for mechanical parts such as bearings and gears. Fixtures, jigs, and snap-fit closures are also some examples. Besides these parts, nylon’s applications also include toothbrushes, electrical connectors, and medical implants.
Nylon has four primary grades, and each grade has different properties.
- Nylon 66: Has a higher melting point and a greater resistance to acids
- Nylon 11: Ideal for outdoor application as it comes with a high moisture resistance
- Nylon 12: Lowest melting point and a relatively low water absorption rate
- Nylon 46: It has an extremely high operating temperature and is usually used for engine and transmission parts.
ABS
ABS – or Acrylonitrile Butadiene Styrene – is an engineering-grade thermoplastic. This material is easy to mold because of its low melting point. It has multiple options with different textures and finishing. Manufacturers can even use colorants with the material. Best of all, ABS has high impact resistance.
Multiple characteristics make ABS a good material option. It is relatively inexpensive compared to other material options, and its properties allow ABS to be used in a wide range of applications.
However, ABS has a low sunlight resistance and is unsuitable for outdoor applications. ABS’s characteristic of generating significant smoke is more problematic and makes it a safety hazard for industrial applications.
You’ll usually use ABS during the production of electronic parts and components such as phone adaptors and keyboards. While ABS might lack the ability to work properly outdoors, it makes up for it by not conducting electricity. This property of ABS makes it a valuable material for electrical devices.
POM
If you’re looking to replace metal for mechanical and automotive parts, POM is exactly the material you need. It is a thermoplastic material known for its strength and rigidness. The best property of POM includes its resistance to solvents such as gasoline, motor oil, and more.
However, POM is vulnerable to certain acids, such as nitric acid. Moreover, failure to ensure uniform wall thickness may cause the material to shrink. Giving POM a cosmetic finish is difficult, as painting on the material is extremely difficult.
POM applications usually involve gears, fans, and automotive and electrical switch components. Its low water absorption and chemical resistance properties make it an ideal pick for outdoor and water-based applications.
Polycarbonate (PC)
Polycarbonate – or PC – is another excellent material that you should consider. PC has top-notch optical properties and allows manufacturers excellent dimensional control. Its predictable and uniform shrinkage comes backed by its toughness and high strength. Best of all, its transparent coloring can be changed to your liking. If you’re looking for strength and durability, PC plastic is the ideal choice. The material is 250 times stronger compared to the glass while remaining lightweight.
PC can maintain its color and strength for a long time. From diffusers to machinery guards, PC is used for various applications. The only major drawback of PC involves their high production costs. Manufacturing PC requires high-grade stainless steel, which might not suit every manufacturer’s budget. The material is also not suitable for food preparation or storage.
PTFE (Teflon)
PTFE is better known as polytetrafluoroethylene. The material has high corrosion resistance and is often used in the medical and electrical industries. PTFE is also widely utilized for long-lasting parts such as bearings and mechanical gears. Its high corrosion resistance makes it an ideal container for chemicals and acids.
PMMA
PMMA – better known as Acrylic – is an excellent thermoplastic material with excellent properties. It’s an ideal alternative to glass due to its low weight, excellent transparency, and shatter resistance. Acrylic comes baked with high tensile strength and a low absorption rate. Best of all, PMMA is ideal for outdoor applications as it strongly resists UV rays and weather.
However, PMMA falters regarding its high cost compared to glass. It’s also easily scratchable and can be stained with greases and oils. Acrylics are also unsuitable for most industrial processes due to their low-temperature service point.
PVC
PVC is another option that manufacturers can choose. PVC, short for polyvinyl chloride, is a cheap and lightweight green alternative material that offers high tensile strength and environmental resistance. You’ll often find PVC usage in automotive parts, windows, and so much more.
PEEK
If you’re manufacturing parts and components for medical applications, PEEK is an ideal material choice for you. PEEK is ideal for a medical environment due to its built-in resistance against gamma radiation and autoclaving. Moreover, this engineering plastic has excellent mechanical properties and chemical resistance. PEEK applications can also involve long-term liquid submersion.
High-Density Polyethylene (HDPE)
Manufacturers often use HDPE for plugs, toys, and totes. That’s because the material has remarkable electrical insulator properties. That’s not all; HDPE characteristics include its natural resistance against moisture and chemicals.
HDPE is tough and is fairly cheap compared to other alternatives. It even has a lower density than water, allowing the material to float. However, HDPE has low surface energy and high shrinkage.
Polyethylene (PE)
Polyethylene has three main types: High density (HDPE), low density (LDPE), and polyethylene terephthalate (PET). We’ve already discussed HDPE. LDPE, or low-density polyethylene, tends to have similar properties as HDPE. They’re only different in terms of melting point, transparency and hardness.
Polyethylene is the only commercial polymer that is selected as per its density. Why? Because its density directly influences the properties of the material. While this isn’t true for PET plastic, all three types of polyethylene share a resistance against moisture and chemicals. PET is similar to LDPE as both materials are as transparent as glass.
PE plastics are the most commonly used plastic materials in the world. They’re used everywhere: from plastic water bottles to toys, cables, and device components.
Polystyrene (PS)
Similar to PE, Polystyrene (PS) is a material renowned for its high optic clarity. There are two types of Polystyrene (PS) currently used by manufacturers for injecting molding: General Purpose Polystyrene (GPPS) and High Impact Polystyrene (HIPS).
GPPS and HIPS have several differences related to dimensional stability and transparency. However, despite their differences, GPPS and HIPS are suitable for injection molding. That’s because both types have uniformed shrinkage that can be easily predicted.
Fiber and Additives
Companies use additives to enhance their properties if the material has all the needed requirements except a few. For example, materials such as POM or PP plastic are reinforced with fiber and other additives for better stability, strength, and stiffness. On the other hand, additives for PC plastic tend to improve the material’s UV or Flame resistance.
Relevant News

